Learn how to repair Sheetrock walls, assess damaged drywall, choose the right patch, and know when moisture, cracks, or ceilings need a pro.
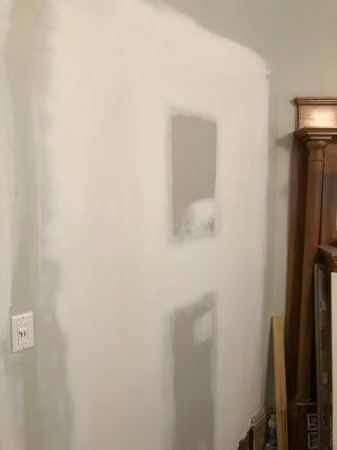
Knowing how to repair sheetrock walls begins with matching the method to the damage. A minor dent, crack, nail pops, or small holes can often be addressed in an afternoon with spackle, mud, tape, and precise sanding. Sheetrock holes and bigger holes, damaged drywall near a ceiling, or moisture-affected areas call for a more considered drywall repair strategy. That may involve new drywall, mesh tape or paper tape, and a utility knife for crisp, stable edges.
For homeowners, the aim is a seamless, paint-ready surface that holds up through painting or beneath wallpaper. For contractors, the priority is a lasting sheetrock repair that vanishes beneath the finish coats. Inspect the area behind and around the damage before beginning, then assemble the right tools for the repair. Keep quick-set mud nearby for a quick repair when the conditions warrant it. For more complex work, professional services can help ensure the finished wall is ready for paint.
Learn how to repair sheetrock walls by assessing damage, addressing moisture sources, and choosing the right materials for dents, cracks, loose tape, corners, and larger holes. The guide covers proper patching, taping, joint compound application, sanding, priming, texture matching, and painting. While small blemishes are often DIY-friendly, recurring cracks, water damage, and complex finishes may require professional repair.
Before selecting a patch, compound, or paint color, examine the wall closely. Understanding how to repair sheetrock walls begins with distinguishing a cosmetic surface flaw from damage that reaches beyond the finish. Scuffs, small holes, shallow dents, nail pops, and a hairline crack are usually minor. With thoughtful preparation, spackle, and a refined finish, these imperfections can often disappear into the surrounding wall. Bigger holes, recurring cracks, soft spots, and stains, however, warrant a more careful assessment.
Begin with the size and location of the damaged drywall. An open wall area is generally simpler to repair than damage near a door frame, window, outlet, corner bead, or ceiling line. Framing, movement, and trim details can all shape the scope of the repair. Press gently around the affected spot. Firm sheetrock that feels dry and stable may require only a patch, mud, or skim coat. If the panel flexes, crumbles, feels spongy, or carries a musty odor, moisture may have compromised the gypsum core. A quick cosmetic fix will not resolve what is happening below the surface.
Water staining calls for particular caution. Look above and around the mark for an active roof leak, plumbing issue, condensation, or evidence of a previous overflow. Address the source and allow the area to dry completely before installing new drywall, tape, paper tape, or mesh tape. Otherwise, discoloration and mold growth can return, and the new finish may fail. A ceiling stain can also point to an issue in the floor system or plumbing above, not merely an isolated ceiling repair.
Measure sheetrock holes rather than estimating by eye. Tiny fastener marks and small holes can often be filled with spackle. Bigger holes or a puncture several inches wide typically require backing and a precisely fitted patch for a durable sheetrock repair. Use a utility knife to remove loose material, then inspect the paper facing around the opening. Torn paper, loose tape, and damaged corner bead can make a drywall repair more involved than expected, particularly once weakened material is removed. Depending on the repair, standard mud or quick-set mud may be the better choice for building and finishing the patch.
Finally, consider the surrounding surface and the finished look you want to achieve. Smooth walls reveal uneven sanding and mismatched texture far more readily than heavily textured finishes. Wallpaper removal, older plaster repairs, and multiple paint layers may also call for a different approach. At MrWalls Drywall & Painting, our local repair services evaluate the cause, structure, and finish requirements together. That ensures each repair is properly sized from the start and the wall looks cohesive once painting is complete.
| What You Notice | What It May Indicate | What to Check Before Repair | Repair Planning Consideration |
|---|---|---|---|
| Nail pop, scuff, small dent, or hairline crack | Usually a minor cosmetic surface flaw | Confirm the sheetrock is firm, dry, and stable | May only need basic preparation and a careful finish |
| Recurring crack | Possible movement or framing-related issue | Check whether it is near a door frame, window, corner bead, or ceiling line | Evaluate the cause before selecting tape, compound, or finish work |
| Soft, spongy, crumbling, or flexing sheetrock | Moisture may have compromised the gypsum core | Press around the affected area and check for dampness or a musty odor | Address the moisture issue rather than covering the visible damage |
| Water stain | Possible roof leak, plumbing issue, condensation, or prior overflow | Look above and around the stain for an active source; ensure the area is fully dry | Repair the source before installing new drywall, tape, or joint compound |
| Ceiling stain | A problem in the floor or plumbing directly above may be present | Inspect the area above the ceiling, including plumbing and floor conditions | Do not treat it as an isolated ceiling repair until the source is identified |
| Tiny fastener hole | Small localized surface damage | Measure the opening and inspect the surrounding paper facing | Can be filled if surrounding material remains sound |
| Puncture several inches wide or larger sheetrock hole | Damage requiring more support than a simple fill | Measure the hole and remove weak material around the opening | Usually needs a backing or fitted patch for a durable repair |
| Torn paper or loose tape | Weak material may extend beyond the visible opening | Inspect how far the damaged facing or tape continues around the area | Plan for a larger repair zone after weak material is removed |
| Broken corner bead | Corner damage that can affect the shape and finish of the wall edge | Check the extent of damage around the corner and nearby framing details | Include corner repair in the overall repair area before finishing |
Reliable sheetrock repair begins well before the first cut or coat of compound. At MrWalls Drywall & Painting, our repair services place preparation at the center of every project. It is often the distinction between a wall that quietly blends into the room and one that catches the eye in afternoon light. A protected work area, sound backing, compatible materials, and a patient drying schedule all matter when addressing minor wear, damaged drywall, or learning how to repair sheetrock walls.
Protect floors, nearby furnishings, and wallpaper with drop cloths before work begins. Remove loose paint, softened gypsum, old adhesive, and damaged texture with care. A sharp utility knife makes it easier to square small holes, trim torn drywall paper, and refine ragged edges around a crack. Dull blades can shred the face paper, creating fuzzy margins that are difficult to finish cleanly. For bigger holes, sheetrock holes, or damage near a ceiling, inspect the framing first. Add wood backing behind the opening before fitting a replacement piece of new drywall. The patch should sit flush with the existing surface; a proud or recessed patch only creates more finishing work later.
Select the joint treatment for the specific repair rather than relying on one material throughout. Mesh tape performs well over stable, flat seams and small patches because it adheres on its own. It should generally be bedded with quick-set mud to help limit cracking. Paper tape, properly embedded in joint compound, is often the stronger choice for seams, inside corners, and areas subject to movement. Press excess mud from beneath the tape, but never leave it dry or starved. Bubbles and loose edges will not disappear beneath later coats.
For nail pops, pinholes, and minor dings, lightweight spackle offers a quick, smooth fill. It is not intended for deep voids, broad patches, or taped joints. Use quick-set mud when the repair requires added strength and a controlled setting time, particularly for deeper fills or mesh tape. Standard premixed mud is often easier to spread across wider finish coats. The aim is to feather the repair well beyond the patch, not build a thick mound at its center.
Keep a sanding block, pole sander, bright work light, clean mixing tools, and a vacuum or damp cloth close at hand. Sand between coats only enough to remove ridges, then inspect the surface from several angles before priming. A final coat of quality primer balances porosity between old paint, new drywall, and compound, helping finish paint apply evenly. This measured process turns a basic drywall repair into a durable, paint-ready surface.
Small holes, shallow dents, nail pops, and the occasional crack can diminish an otherwise polished wall or ceiling, particularly when fresh paint catches the light. For drywall repair that endures, MrWalls Drywall & Painting evaluates every section of damaged drywall with care, from minor sheetrock holes to bigger holes requiring new drywall. Loose material is trimmed away with a utility knife before the team selects the appropriate spackle, mud, or quick-set mud for the repair. Where reinforcement is needed, seams receive mesh tape or paper tape. Each area is built in measured, controlled layers to create a seamless surface. If you are researching how to repair sheetrock walls, meticulous preparation is essential: the surface is sanded flush, primed, and ready before painting begins. These sheetrock repair services deliver a refined result, not a quick patch that reveals itself beneath paint or wallpaper.
A crack in drywall is rarely only cosmetic. It can signal seasonal movement, settling around a door or window, a poorly finished seam, or moisture affecting the sheetrock below the surface. Before drywall repair begins, the area should be evaluated for the underlying cause rather than simply concealed with spackle and paint. For a stable crack, a utility knife opens and cleans the line, removing loose material so fresh compound can bond securely. Where movement is ongoing, mesh tape or paper tape provides dependable reinforcement designed to help the repair endure changing conditions.
Loose tape calls for more than a quick swipe of mud along the edge. Bubbling or lifting tape should be cut back to sound material, with the exposed joint inspected for moisture damage, nail pops, or weakened drywall beneath. Fresh paper tape is embedded in joint compound, feathered well beyond the seam, and built up in measured coats. quick-set mud may be used when a faster cure is needed. The finished surface should be smooth, durable, and ready to disappear beneath sanding and painting, without a ridge, shadow line, or visible repair.
Damaged drywall corners deserve the same disciplined approach. Outside corners absorb everyday impact from furniture, bags, and foot traffic, often leaving cracked compound, dented metal, or crushed board along the edge. A lasting sheetrock repair may require removing compromised corner bead, rebuilding the backing, and setting a new straight edge before applying mud. For minor damage, small holes and chipped sections can be squared, reinforced, and reshaped to restore a clean, crisp profile. bigger holes or sheetrock holes may require new drywall to return the wall’s strength and original form.
MrWalls Drywall & Painting brings thoughtful preparation to every repair, matching texture, sheen, and surrounding wall conditions for a seamless finish. Whether clients are searching for how to repair sheetrock walls, addressing damaged drywall, removing wallpaper, or comparing professional services, the standard remains the same: after paint, the repaired surface should blend naturally into the room, with no flashing, recurring tape failure, or evidence of the work left behind.
Bigger holes call for more than a quick coat of compound. When sheetrock holes extend beyond a few inches, reach a stud, interrupt a corner, or show soft, water-damaged edges, the soundest repair is to remove compromised material and install new drywall. This work goes well beyond filling small holes, smoothing nail pops, or addressing a minor crack with spackle. Begin by inspecting the area behind the damage for wiring, plumbing, and insulation. Use a utility knife to score the face paper, then cut a clean square or rectangle around the opening. Crisp, straight edges make the patch easier to fit, finish, and blend into the wall or ceiling.
If the opening falls between studs, install wood backing inside the wall. Slide a board longer than the opening through the hole, hold it securely against the back of the existing panel, and drive drywall screws through the face to anchor it. Add backing on each side when the patch is large enough to flex. Next, cut new drywall to fit the opening and match the thickness of the surrounding board. A patch that sits proud or recessed can remain visible beneath the finished surface, even after several coats of mud.
Fasten the patch to the backing or studs with drywall screws. Set each screw head just below the paper surface without breaking it. Cover the joints with tape. Paper tape creates a crisp, durable seam when properly embedded, while mesh tape can be a practical choice for a small, stable patch. Apply a thin first coat of mud over the tape and screw heads, pressing it firmly into the joint. After it dries, lightly sand any ridges and apply a wider second coat, feathering the edges well beyond the seam. Quick-set mud can shorten the wait between coats, but disciplined application remains essential. Finish with a skim coat that blends the repair into the surrounding wall rather than leaving a raised rectangle.
Exceptional drywall repair relies as much on preparation as precise patch placement. Let each coat dry fully, sand with a fine grit, and hold a work light across the wall to reveal low areas, edges, and tool marks before priming. Prime the patched surface before paint so new drywall and joint compound absorb the finish evenly. If a leak caused the damage, do not close the wall until the moisture source is fixed and the cavity is dry. For homeowners learning how to repair sheetrock walls or comparing sheetrock repair with professional services, these details define the result. From matching texture before painting to protecting nearby wallpaper, MrWalls Drywall & Painting can identify the cause, rebuild the affected section, and match the wall texture for a seamless result.
A successful wall or ceiling repair is about more than a patch that looks acceptable once the tools are put away. Texture matching, priming, paint, painting, and moisture control all play essential roles. These final details determine whether the repaired area disappears into the room or draws attention in changing light. At MrWalls Drywall & Painting, we approach sheetrock repair as a complete finishing process, giving the surrounding surface the same care as the damaged spot.
Texture is often what separates a seamless repair from an obvious one. Orange peel, knockdown, hand-applied finishes, smooth walls, and older plaster each call for a distinct technique. A patch may be structurally sound, yet mismatched texture can still show through paint, appearing heavier, flatter, or differently patterned than the surrounding wall. Thoughtful blending extends beyond the immediate repair, creating a finish that reads as consistent from a normal viewing distance. This matters especially on a ceiling, where overhead light can expose a ridge, sanding mark, nail pops, crack, or uneven sheen. For small holes and minor blemishes, spackle may be sufficient. Bigger holes and sheetrock holes often require new drywall, reinforcement, mesh tape or paper tape, and carefully layered mud.
Before painting, repaired drywall needs primer. Fresh joint compound and quick-set mud absorb paint differently than an existing painted surface. Without primer, the patch can flash through as a dull or uneven area, even when the color match is correct. Wallpaper requires a more considered decision. Minor repairs may be possible behind a carefully lifted section, but older or brittle wallpaper can make a seamless repair impractical. A professional can determine whether localized repair, wallpaper replacement, or preparing the wall for paint will deliver the cleanest long-term result.
Damaged drywall affected by water deserves particular attention. Drying the material is not the same as restoring it. If sheetrock has softened, swelled, stained, developed mold, or lost structural integrity, replacement is usually the wiser choice. The source of the water must be corrected first, whether it is a roof leak, plumbing issue, appliance line, window intrusion, or condensation problem. Repairing a stain without resolving the moisture behind it simply postpones the next drywall repair.
For minor surface blemishes, a careful homeowner can achieve strong results with patience, the right materials, and a utility knife used precisely. Anyone researching how to repair sheetrock walls should match the repair method to the scale of the damage. Larger openings, recurring cracks, sagging ceiling areas, extensive moisture damage, and difficult texture matches are best handled by experienced services. Professional sheetrock repair follows the proper sequence: removal, reinforcement, tape, finishing, sanding, texture work, priming, and painting. The result is a durable surface that looks intentional, performs well, and is ready to live with.
Small nail holes, dents, and minor punctures can usually be filled with lightweight spackle or joint compound. Remove loose material, apply thin coats, allow each coat to dry, sand flush, then prime before painting for an even finish.
A hole wider than a few inches, an opening with broken or soft edges, or damage that causes the wall to flex usually needs a fitted drywall patch with backing or support from studs. Compound alone is not strong enough to rebuild larger missing areas.
Paper tape is generally the stronger choice for seams, corners, and areas prone to movement when embedded correctly in joint compound. Self-adhesive mesh tape can work well on stable small patches, especially when used with quick-set mud.
Loose drywall tape can result from insufficient compound beneath the tape, poor bonding, moisture damage, or movement in the wall. Cut away loose material, inspect the area for moisture or crumbling drywall, then install and feather new tape over a sound surface.
Primer is recommended. New drywall and joint compound absorb paint differently from an existing painted wall, which can create flashing, dull spots, or uneven sheen. Primer seals the repair and helps the finish coat blend consistently.
First repair the leak, plumbing issue, condensation source, or other moisture problem and fully dry the area. Replace sheetrock that is soft, swollen, moldy, stained, or structurally weakened. Covering water damage without correcting its cause can lead to recurring stains and failure.
Professional help is worthwhile for large holes, recurring cracks, damaged corner bead, sagging ceilings, active or extensive water damage, and difficult texture matching. Experienced drywall repair can also help ensure the patch, texture, primer, and paint blend into the surrounding wall.